This post may contain affiliate links. Please see my advertiser disclosure for more details.
See also Part 2: DVD Shelf Project
Can we talk about Ken’s DVD / Blu Ray collection for a few minutes?
When I first met Ken back in 2007, I was pretty impressed, yet perplexed, but his extensive DVD collection. Why would you buy all those DVDs when you could just rent them from Netflix? How can you even watch all those DVDs? Just, why?
Well, I have grown to love the DVD collection, which now includes a lot of Blu Rays as well. But, we were running out of space. These DVD shelves had served him well for a while, but we were bursting at the DVD shelf seams.
The Old Shelves
As you can see, most of the shelf space was taken, and things were stacked precariously on top. We also mixed in a random assortment of junk. In other words, our DVD shelves were overflowing, and it wasn’t pretty! Plus, we thought the vertical dividers wasted a lot of space.
Disclaimer / Note of Embarrassment #1: Why yes, that is a faux brick wall behind our DVD shelves. Redoing our basement to get rid of the paneling and faux brick is on our medium-term project list, so it stays for now.
Disclaimer / Note of Embarrassment #2: We have virtually no natural light in our basement, so please forgive the lighting in these photographs. (Update: we finally have better light!)
Proof of Concept (and almost giving up)
We started out with some proofs of concept (proof of concepts?). At first, we really liked the idea of glass shelves and how sleek they would look. But after pricing out glass shelves, especially considering how many we would need, we realized that glass was WAY more expensive than we were willing to spend.
Also, any sort of “hack” seemed out of the question. In general, DVD cases are only about 6 inches deep. Many storebought shelves, like from Ikea, are at least 10–12 inches deep, and we wanted to keep the shelves as shallow as possible so they wouldn’t jut out much beyond the actual DVD cases.
Next, we purchased some 1/4“ acrylic that we ordered from a local supplier. Specifically, it was 6”x48“ 1/4” Clear Plexi Glass (Acrylic). It was $13.17 per piece. Unfortunately, even with the shelf brackets / clamps we purchased, the acrylic was too flimsy to hold DVDs. The 1/2″ acrylic might have been thick enough, but like the glass, it was more than we wanted to spend. So, acrylic was out.
Then we explored melamine options. The melamine was very inexpensive, but it LOOKED cheap too, so that was out.
We tinkered with some MDF options, but that would have to be primed and painted (and potentially sanded too. There seems to be conflicting information online about whether MDF should be sanded before priming and painting). Since we live in a townhouse with no garage space and just a tiny backyard, it would have been difficult to prime and paint all that MDF (including waiting for drying in between multiple coats).
And, there was an additional issue with the MDF. The edges of MDF are not finished edges, and you cannot easily prime and paint them. (Some online tutorials mentioned you could essentially spackle the unfinished edges, giving it a drywall-like covering). But again, doing that for so many shelves seemed too time consuming and difficult, especially considering I can barely spackle a drywall hole without it looking like crap. There was an option to cover the edges with T-Molding, which we would have had to apply to the shelves using a very specific “T-Molding Slot Cutter Combo,” that cuts into the edges using a trim router.
Perhaps if we had a dedicated workspace in the house (you know, beyond our carpeted basement), we would’ve explored those options a bit more.
Here are some photos we took of the three options. As you can see, the acrylic shelf on top looks wavy and is bowing on the edges when filled with DVDs. Although it’s hard to tell in this photograph, the unfinished edge of the MDF (the middle shelf) was kind ugly and would take too much work to cover. And on the bottom was a white melamine shelf we bought from Home Depot. To us, it just looked too cheap-y.
Select Pine Board to the Rescue!
We almost gave up on the entire project. But one day, while browsing Home Depot for ideas, we found a selection of wood called Pine Board that was sold near the decking materials. In its unfinished state it was completely smooth, so we could use it as-is (although it could be easily stained). It came in a size that we we needed (1 inch high by 8 inches deep), and above all, it was very reasonably priced!
We were having a lot of trouble finding brackets that weren’t: 1) overly expensive, 2) overly ornate, or 3) too bulky. We wanted the DVDs to be able to fit nearly flush against the wall and we didn’t want them to bump into curved brackets or anything. We found these Zinc Plated Corner Braces at Home Depot that worked fantastic as shelf brackets!
After taking home two pieces to do a proof of concept, we were totally sold. Ken double checked his measurements and we went back to Home Depot and bought the rest of the wood.
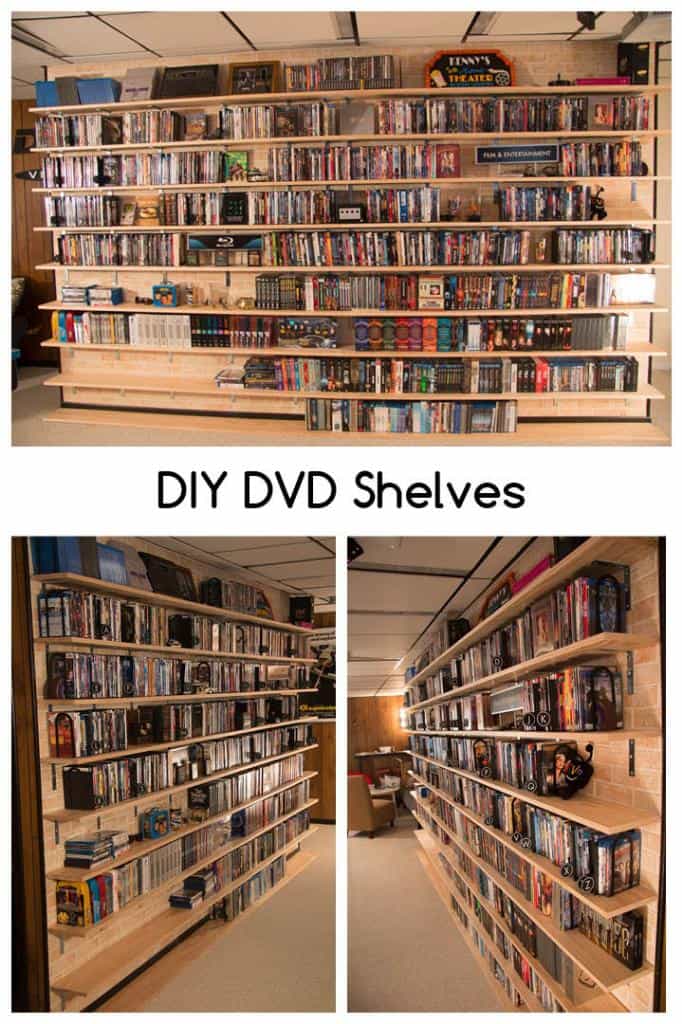
End Product
Check out Part 2: DVD Shelf Project
Whew! That was a long and intensive project!
7 comments
[…] news, Ken has been installing recessed lighting in our dark basement (which I’ve mentioned here before). It is amazing how much the lighting changes the mood in the […]
how much did you end up spending in materials?
Where did you get the ABC separators from?
The Borders book store going out of business sale in 2011!
How is this holding up? I’m planning on doing the same thing but with 6inch deep shelves and 4 inch brackets. I am a little concerned that the shelves will start to bend with the weight of the DVDs as we do have a good amount of steelbooks which weight a bit more when combined than DVDs
This is great, thanks for sharing!
If you’re still using this setup, how is it holding up?
Yes, still holding up great!