This post may contain affiliate links. Please see my advertiser disclosure for more details.
 DIY Recessed Lighting Installation | The Process so Far!
Now that the actual lighting fixture was installed, it was time to rinse and repeat, over and over again, for each fixture we wanted installed.
As a reminder, this was the layout that we were following to install the lights (each box with an L indicates where we were going to install a light).
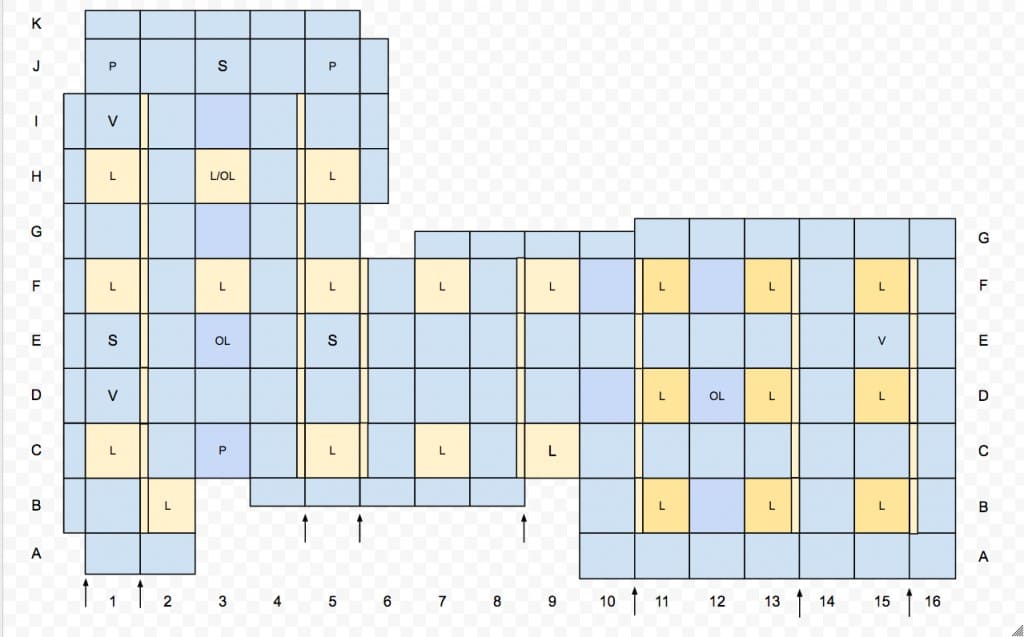
We had it printed out and consulted it continuously throughout the installation process.

As a reminder, we decided to have three “zones” of lights in the basement. Each zone would be controlled by an individual switch. We had those three switches installed by an electrician before we started the DIY portion of this project. Here are the three switches that we had installed by the electricians:

We repeated the process that we followed in Part 2 for each of the light fixtures, connecting them together and setting them up.


Testing that the Recessed Lighting Housing was Set Up Correctly
And now it was time to play god and proclaim LET THERE BE LIGHT. Just kidding, it was just time to install the lightbulbs temporarily to make sure that everything was wired properly. (We use these dimmable lightbulbs, because we had dimmable switches installed).


After we confirmed that the lights turned on (meaning that the fixture was properly set up), it was time to close up the fixture box with the cover plate that came with the fixtures. We waited until the very end to do this, after we had confirmed that all the fixtures were working.


Cutting Holes in Ceiling Tiles for Recessed Lighting
Now it was time to actually make those lights look pretty in the ceiling. That involved cutting holes in our ceiling tiles.
Ken created a template to make cutting process easier.
First, he took a ceiling tile and drew an X on the back of it, using a yard stick to keep things straight. This marked the exact center of the ceiling tile.


Then he drilled a small hole at the center of the X that he had just marked.


And now it was time to put our template into action. We had a lot of ceiling tiles to cut holes in!

We laid a new ceiling tile on the table.

Then we placed the template (the tile that we had just drilled the hole in) on top of the ceiling tile.

We lined up the two tiles evenly.

And, we just drilled a hole through the existing hole in the template, all the way down to the new ceiling tile.
Now, that meant that the center of the new tile had been marked precisely without having to get out the yard stick. (Which would’ve gotten very tedious because we had so many ceiling tiles).
Next up, it was time to break out the hole saw. Our lighting trim was 4 3/8″ in diameter, so we bought this hole saw. Check out the instructions for your particular recessed lighting trim to determine what size hole saw you might need.

We attached it to the drill.

And then we were able to start drilling the hole precisely in the center of the ceiling tile, since we had just marked that using the template!


So now it was time to place the ceiling tile where one of the fixtures had already been installed.


This took a little bit of maneuvering to get the fixture to plop precisely in the ceiling tile hole. But, it finally got there! For the trim piece that we were using, the light had to be slightly above “flush” with the ceiling tile. The positioning might vary depending on the trim style that you choose.

Installing Recessed Lighting Trim Piece
But, of course, it wasn’t quite done yet. Next we needed to install the trim piece. (We talked about the different trim options we considered back in Part 2).
Here is what the trim parts looked like.

Those two metal pieces were basically little tension rods that would keep the trim piece in place. Then, there was some minimal assembly required.

Notice the wingnut pictured here in the housing. We ended up taking it off (but while it was in the ceiling) to make the socket moveable, which we needed to do for the type of trim we were using. So, after removing the wingnut, the socket part started to dangle.


We discovered that, depending on the trim pieces you use, you may not have to do this step. We also discovered that some recessed lighting housings do not include “moveable” sockets, in which case you’d have to buy something like this, a socket extender. One of the reasons we liked these housings is because it allowed the socket to be moved. So, that avoided the cost of having to buy extra extenders.
Now, we could finally install the trim piece!


Then, that was it (well, for that ceiling tile anyway!) It was just time to repeat the process for all the other ceiling tiles that would have lights! (Oh, and install the lightbulbs of course!)


The lighting in our basement now is SO much brighter with these recessed lights. Because we were installing so many lights, and because it was a learning process as we went, the installation process did take quite a while. Probably a month or more (just doing it in our spare time after work and on weekends). But, we estimate that it probably saved us $3000+ in electricians’ fees. (The electricians estimated it would be about 15 hours work for them at $175/hour). So, it was definitely worth it for us!
2 comments
OMG. SNES, Atari and Back to the Future.
Ha, it took me a second to figure out what this comment was all about! Then I was like, OHHH, the gaming systems and other things on our DVD shelves that make an appearance in the photographs! Yep, we have a big collection. You can see more of it here: https://supernovaadventures.com/2014/10/dvd-shelf-project-part-2/