This post may contain affiliate links. Please see my advertiser disclosure for more details.
DIY Recessed Lighting Installation in a Drop Ceiling (Ceiling Tiles) – Prep Work - DIY Recessed Lighting Installation (Part 2)
- DIY Recessed Lighting Installation in a Drop Ceiling (Ceiling Tiles), Part 3
So, after removing the old, ugly light fixtures that we didn’t want anymore, it was time to start fresh with our new fancy recessed lighting!
Keep in mind that we are NOT electricians! This is just the process we followed for installing the lights.
We bought our recessed lighting mounts from USA Light. We started out by buying the “housing,” aka the fixture, (Update October 2018. It looks like that link doesn’t work anymore and that exact product isn’t made anymore. But this other fixture looks very similar from USA Light. And here’s a very similar looking one sold on Amazon too) and a few different kinds of recessed “trims”, including recessed light trims that only point down, ones that you can point in different directions, and “wall wash” trims. (Again, it looks like some of the trims may have been discontinued from USA Light, but here is an option from Amazon. Just make sure you buy the size that matches the recessed light housing).
We ultimately decided on the ones that just point straight down. We didn’t really have any need for the directional ones.
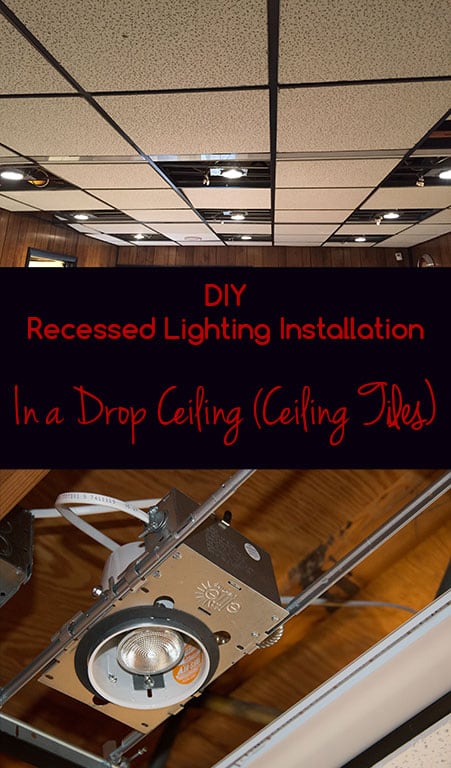
Here’s what one of the fixtures looked like as it sat on our table: Seriously, if somebody had asked me what this was before I actually knew, I don’t think I would’ve ever guessed. I had no idea this is what recessed lights looked like. For what it’s worth, these types of fixtures are called “new construction” recessed lighting fixtures (as opposed to “remodel” fixtures, which are used in pre-constructed drywall ceilings).


There was a small box on the one side of the fixture that we needed to work on before the light could ever go in the ceiling (It wasn’t totally necessary to work on it before putting it in the ceiling, but it was easier to work on it on the table instead of over our head!).

The box had some cables in it, which Ken pulled out to make it easier to work with.

Then, he turned the fixture to the side and removed one of the little round tabs.


(Note the wires coming out of the fixture. Those came pre-installed with the fixture. This is important because we refer to it later in this post. Those things on the ends of the wires are called “push-in connectors.”)
Then he flipped the fixture to the other side and removed the top round tab. Keep in mind that it doesn’t really matter which of the tabs we removed. We just removed the ones we thought would be easiest to work with when we were wiring. Basically we needed two of them removed so that we could put wires going “in” to the fixture, as well as wires going “out” from the fixture to the neighboring fixture. If this was the last fixture we were installing, we’d just punch out one of the tabs for the wires coming “in.”

Those round tabs he removed had to be replaced with these things called clamp connectors, which we made sure matched the size of the tab holes on our fixture. These were important to have because the hole where we removed the tabs were quite sharp on the edges. It also wouldn’t do much to secure the wires (from moving around) if you don’t have the clamp connectors. Wires and sharp edges don’t sound very safe, so we definitely wanted to use the clamp connectors.

They’re actually two parts, and he unscrewed them because each part would have to go on opposite sides of the hole.

T

Voila.
Now it was time to position the fixture in our ceiling and do some initial wiring.

The fixtures have these little slots in them that allow them to sit perfectly on the drop ceiling grid.


Next, we took some wire called Romex 14/2 wire that we Bought from Home Depot. Ken had figured it all out the type of Romex wire we needed. We wanted 14 gauge, and 2 (14/2) for the number of wires not counting the ground inside the wire. Since, for this part, we weren’t wiring the fixture directly to a switch (just light fixture to light fixture, the wiring to the switch had already been done by the electricians), we didn’t need one of the “3” Romex wires.

(Sorry, I didn’t get a picture of the wire in the bag, so this crumpled up photo of the bag is all you get:)

Ken and I fished up the Romex wire into the ceiling, just roughly where it needed to go.

Then he took some wire strippers


The inside of that wire consisted of three thinner wires: one white, and one black, and one “bare” (copper) wire. Ken pulled those three wires (still attached to the white sheath), through the hole where he had removed those tabs from and had subsequently affixed the clamp connector to.


Then he attached tightened the clamp connector, ensuring that the wires are secure and don’t move. (There were screws on the clamp connector to do this).
Now it was time to connect those new wires (from the stripped sheathing) to the existing wires that came with the recessed lighting fixture. (The wires that we pointed out to remember in the earlier picture 🙂 )
He cut off the sheathing from the black and white wires (the insulation of the wires). Then, he matched “like with like” by inserting the freshly unsheathed wires into the “push in connector” of the wires that came with the fixture. So, he put the wire that had the black sheath in the push in connector that had the black wire on the fixture, the one with the white sheath to the white push-in connector, and the bare wire to the “green” wire push-in-connector.

Whew! Okay, I think that’s enough for Part 2, what do you think? We’ll talk more about the next steps in our process in Part 3!
DIY Recessed Lighting Installation in a Drop Ceiling (Ceiling Tiles) – Prep Work - DIY Recessed Lighting Installation (Part 2)
- DIY Recessed Lighting Installation in a Drop Ceiling (Ceiling Tiles), Part 3